Using Dentrix, you can create and maintain a database of insurance companies. In the Family File, you can also enter new insurance plans.
Note: By default, the current patient is assigned as the Insurance Subscriber.
To enter a new insurance plan
1. Select a patient in the Family File.
2. Double-click the Insurance Information block.
The Insurance Information dialog box appears with the Dental Insurance tab selected. The primary and secondary insurance information are displayed.
Note: To enter medical insurance instead of dental insurance, click the Medical Insurance tab.
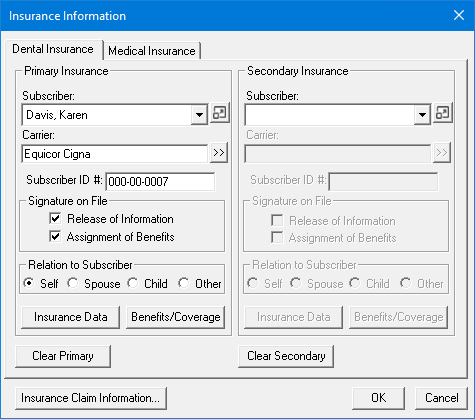
3. Under Subscriber, click the dropdown arrow, and then click Patient Name/New Insurance Plan.
Note: The current patient is automatically entered as the Subscriber.
4. Click the Carrier search button.
The Select Primary Dental Insurance Plan dialog box appears.
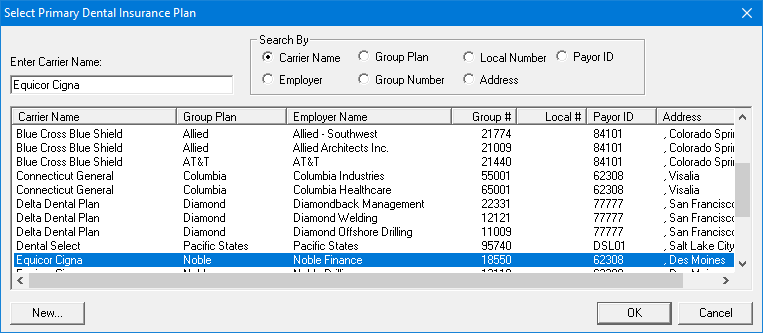
Important: To ensure that you have not entered the insurance company previously, type the first few letters of the carrier name in the Enter Carrier Name text box. Matches for the letters you enter appear in the list.
5. Click New.
The Dental Insurance Plan Information dialog box appears.
6. Enter the following information:
Carrier Name – Type the insurance carrier's name.
Group Plan – Type the group plan name or click the search button to select a group plan. If you do not have a group plan name, use the employer name.
Employer – Click the search button to select an employer. The insurance plan is linked with the employer so that, when you enter patients with this employer in the Family File, you can search by employer for the correct insurance plan.
Street Address – Type the insurance carrier's address, city, state, and ZIP code.
Phone – Type the insurance carrier's phone number, extension, and Fax number, if applicable.
Contact – Type the name of your contact at the insurance carrier.
Group # – Type the plan number. If the plan is a union plan, type the local chapter's number.
Web Page – Type insurance carrier's website address.
E-mail – Type the insurance carrier's email address.
Claim Format – Defaults to "DX2012" for new users. This is the standard ADA form that can be generated using a laser printer. When DX2012 is selected, you can print claim forms to blank paper or send them electronically.
Note: For dental insurance plans, you can print the standard ADA form DX20012 using a laser printer. You can also send DX20012 claim forms electronically. If printed, Dentrix includes both the insurance claim form and the information for the claim. You can use the DX20012 form to create most insurance forms, but some carriers require their own form and will not accept standard ADA forms. Dentrix integrates with many forms. If you need to use a carrier-specific form, contact Dentrix Support for help in setting this up.
Fee Schedule – Click the search button to attach a fee schedule to the carrier.
Note: If you attach a fee schedule to the insurance carrier, that fee schedule is used instead of the fee schedule attached to the patient’s primary provider. However, if you selected a fee schedule for the patient, that fee schedule is used instead of the one attached to the insurance carrier. (This depends on the specific claim form you selected, since some claim forms are designed to print a specific fee schedule.)
Alt Code – (Optional) defaults to the ADA procedure codes. To use a different code system when printing insurance claims for this carrier, click the Alt Code search button.
The Select Alt Code dialog box appears, and you can make your selections from the available alternate codes.
Payor ID – If you subscribe to Dentrix eClaims, type the ID or click the search button to select one.
Note: The payor IDs in this list are updated periodically; you can download the latest list when you submit electronic claims. For more information, see "Downloading eTrans Updates" in the eTrans for Dentrix User's Guide. If a payor ID is not shown in the list, you can use the Payor Search tool on dentrix.com to look up a Payor ID and manually enter it.
Provider ID Setup – Click the button to specify a specific insurance ID for a provider. For information on how to set up multiple IDs for a provider, click Setting up provider IDs.
National Plan ID – If you subscribe to Dentrix eClaims, type the ID for the carrier.
Source of Payment – If you subscribe to Dentrix eClaims, select the appropriate source for the carrier from the list.
7. Under Insurance Claim Options, do one or more of the following:
Replace initial character of procedure code with – Select if the carrier requires the new ADA CDT-3 or CDT-4 codes, and you have not converted all of your codes to this format. Type the appropriate letter to replace the initial character of each procedure code, such as "D."
Do Not Include Dental Diagnostic Codes – Select to exclude dental diagnostic codes on claims. (This option is dependent upon the specific claim form selected, since some claim forms do not have an area in which to print diagnostic codes.)
Do Not Include Group Plan Name – Select to exclude the group plan name from printing on the claim or from being sent electronically.
Do Not Bill to Dental Insurance – Select to prevent creating batch insurance claims for the carrier, to confirm whether you want to include or exclude procedures flagged as "Do Not Bill to Dental Insurance" when you create a claim, and to exclude procedures from the Procedures Not Attached to Insurance report.
Print Name for Provider's Signature Claims – Select to print the provider's name on claims instead of the provider's signature.
8. Click OK.
The Insurance Information dialog box appears.
9. Do one or more of the following:
Subscriber ID # – Type the subscriber ID. The subscriber ID may be the Social Security number of the subscriber, or you may use another number instead.
Release of Information – (Default) Select to print "Signature on File" on the insurance claims for this subscriber to authorize release of information.
Assignment of Benefits – (Default) Select to authorize payments directly to the provider.
Note: If you do not select this option, insurance checks will be mailed to the subscriber, not to your office.
Relation to Subscriber – Select Self, Spouse, Child, or Other to identify the patient’s relation to the subscriber.
10. Click OK.